
Halloween invade todo! y cuando digo todo digo todo!!! también nuestra sección de Nail Friday!! en este capítulo Verónica nos trae no solo una, sino dos manicuras para Halloween, por un lado una manicura más trabajada y algo más complicada recreando telarañas y otra mucho más fácil y divertida creando pequeños fantasmitas... pero no voy a desvelar más os dejo con ella!!
Halloween is invading everything! and when I said everything I mean everything!! even our Nail Friday series! and in this chapter Verónica doesn´t bring one but two manicures for Halloween, the first one is much more worked and complicated, we create spiderweb and the other one much easier and fun creating a cute ghosts... but I will not uncover any more details I leave you with her!
Disfrutad!
Enjoy it!


Hola chicos!! ya estamos aquí y como dice Silvia hoy vamos a dejarnos invadir por esta cada vez más famosa y celebrada fiesta de Halloween, en otros países es muy famosa pero en España está entrando poco a poco cada año, así que este año nos hemos dejado llevar un poco más!
Hi guys!! here we are and as Silvia said we all over Halloween these days, in other countries is very famous but in Spain is getting more popular by the year, and this year we are going all out with it!
Hoy os traigo las dos primeras manicuras una más complicada que necesitas un poco más de pulso pero que queda muy sorprendente, que es una Telaraña con un fondo en naranja típico de Halloween, y por otro lado vamos a crear otra manicura súper fácil y muy divertida que son Fantastimas con base negra y ojos blancos, muy fácil!!
Today we start with two manicures one a bit more complicate that needs a bit more of a steady hand but very striking, a Spiderweb manicure with the typical orange Halloween color and other one much more easier and fun creating Cute Ghosts in a black base and white eyes!
Vamos a empezar!
Let´s start!
Productos:
Products:
*Base naranja Rituals 6890 tulip.
*Laca negra Belle & Make-up 70 black no the road.
*Orange base Rituals 6890 tulip.
*Black nail polish Belle & Make-up 70 black no the road.


1. Empezamos aplicando un par de capas de tu color base, en este caso tiene que ser naranja para que el efecto de Halloween sea mucho más intenso, aplicaremos usando la técnica de dejar un pequeño espacio entre la cutícula y el color para asegurarnos una manicura perfecta. Déjala secar completamente antes del siguiente paso, esto es muy importante.
1. We will start adding a couple of lawyers of the base color, in this case I am suggesting to stick to the orange cause it will make look much more Halloween manicure, apply it using the technique of leaving a space between the cuticle and the color to make it look much neat. Leave it to get completely dry before next step, this is very important.

2. Coge el color negro y haz la típica manicura francesa, pintando solo las puntas de las uñas, de todas las uñas y déjalo secar.
2. Take the black nail polish and do the typical french manicure, painting the tips of the nails, the all the nails and leave it to get completely dry.


3. El siguiente paso es crear las líneas base de la telaraña, para eso vamos a crear tres o cuatro líneas, dependiendo de la uña, que van desde la punta negra hasta la base de la uña, dejando una separación uniforme entre líneas y no te preocupes si no están totalmente perfectas porque estamos creando telarañas!
3. The next step will be creating the base lines of the spiderweb, for that we will create three or four lines, depending of the nail, that goes from the black tip to the base of the nails, leaving a uniform separation between the lines and don´t worry of creating a perfect lines cause we are doing a spiderweb!


4. El siguiente es crear el resto de la telaraña, para eso creamos líneas con una pequeña curvaruta que van de línea a línea desde la punta negra hasta la base de la uña, una vez más intentando conseguir un espacio similar entre ellas y no hace falta que estén perfectas.
4. The next step is do the rest of the spiderweb, we will create lines with a soft curve form on them from the black tip to the base of the nail, again trying to leave a similar space between the lines and again don´t worry about being neat.


5. Y como último paso añade una capa de top coat en la manicura cuando esté totalmente seca, y queda así de bien!
5. And the last step is to add the top coat to the manicure once everything is dried and we are done!


Vamos a por la siguiente manicura! súper fácil ya veras!
Now we are doing the second manicure much easier you´ll see!
Productos:
Products:
*Laca negra Belle & Make-up 70 black no the road.
*Laca blanca Essence Nail Art 001 white.
*Black nail polish Belle & Make-up 70 black no the road.
*White nail polish Essence Nail Art 001 white.


1. Empezamos añadiendo dos capas del color negro base, y dejamos que se seque totalmente antes de continuar.
1. We will start adding two coats of black nail polish base and leave it to get completely dry before continue.

2. Para crear los ojos del fantasma yo uso un bony, que es un alfiler más grueso con una base redonda que suelen ser de colores, uso esta parte para mojarla en la laca blanca y crear los círculos blancos con mucha más facilidad y creándolos bastante iguales. Déjalo que se seque.
2. To create the ghosts eyes I am using pin with a big head, those that comes with different colors, and I am using this head to create the eyes dipping this part on the white nail polish and creating a very similar and round eyes without much work. Leave it to get dry.


3. Para crear el iris negro del ojo, vamos a usar una herramienta punzón para ello, también puedes usar el mismo alfiler de antes pero por la punta u otra herramienta que te pueda ayudar a crear puntos uniformes, házlo en el centro de los puntos blancos y puedes hacerlos unos más arriba que otros para crear un efecto más divertido.
3. To create the iris of the eye we will use a pricker tool, or you can use the other part of the pin that we used before, and create a uniform dot on the center of the white circle, you can create these black dots one upper that other or lower that will create a very fun look.

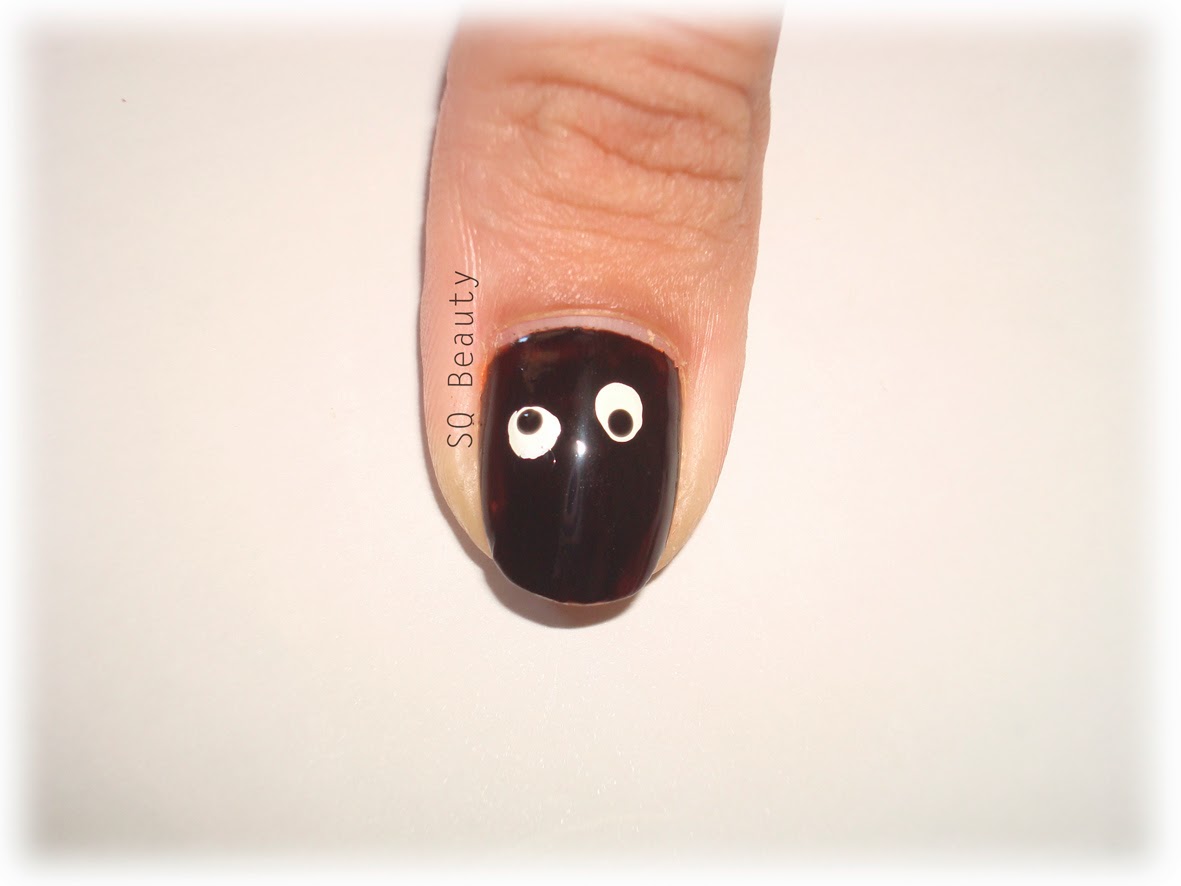
4. Deja que se seque completamente y añade la capa final de top coat y ya está! la manicura de fantastitas lista!
4. Leave it to get completely dry and add a top coat to the manicure and we are done! a very cute fun ghots!

Espero que os haya gustado y nos vemos en el siguiente capitulo que también será de Halloween, así que prepárate para más sustos! Hasta dentro de dos semanas!
I hope you liked it and we see each other in the next chapter that we will continue with Halloween manicure, so get ready to get spook out!

Verónica Martínez
Instagram Vfemale26
Me han gustado mucho las manicuras de Verónica y creo que son súper chulas para esta época! tenemos que hacernos alguna!!
I love these Verónica´s manicures and I think they are so cute for this time! we have to do some of them!
Ahora os dejo con otras manicuras de Nail Friday y posts de uñas,
I will leave you with more Nail Friday manicures and nail posts!
Hasta la próxima,
Until next time,